Friday, February 17, 2017

DIY Passerelle / Gangway

After my gangway got lost, probably during a very heavy storm, I started to look for a new one. During my shopping searches I saw that the least expensive one is around 375€. So I started my own project. Build a gangway, light, strong and cheap!

First I tried to figure out how can I build a construction out of aluminum profiles, fixing them together etc then I figured out someone already did that for me :) also did it much better, cleaner and stronger: LADDER!!!


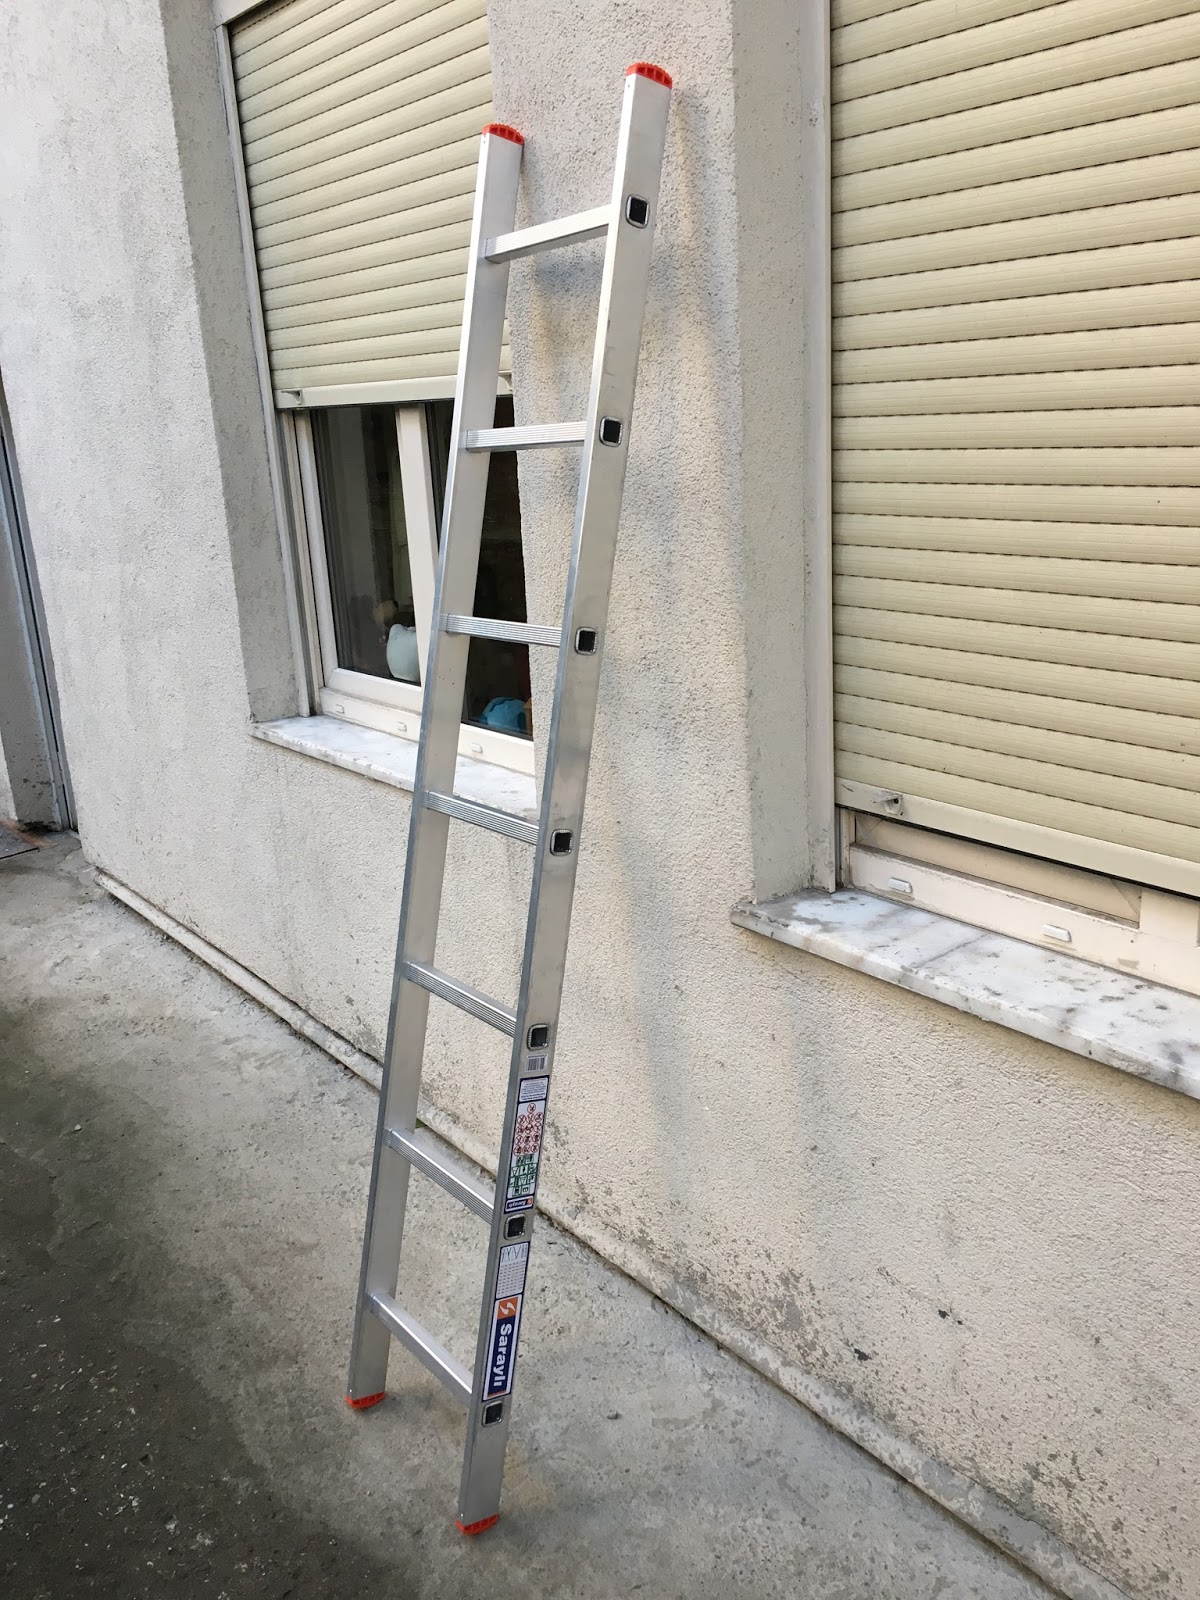
I choose a ladder which is 200 cm long and 35 cm wide.

Then I went to buy plywood which is resistant to water from a nearby store where they cut it according to your will. Unfortunately I did not have much choice for color and texture so here is what I could find:

18 mm Brown plywood:


I cut the plywood in dimensions of inner walls of ladder. The thickness of the plywood was 18 mm and the distance between steps and sidewall was 15 mm so there was a 3 mm difference in between. You can skip this step but I had time and a wood router.


So I took off 3 mm from the sections that corresponds to steps. 


Then used 3 stainless wood screws for each step to mound the ply to the ladder. Of course, I used a master to mark the drilling points. You don't have to but it feels better and much high quality. 

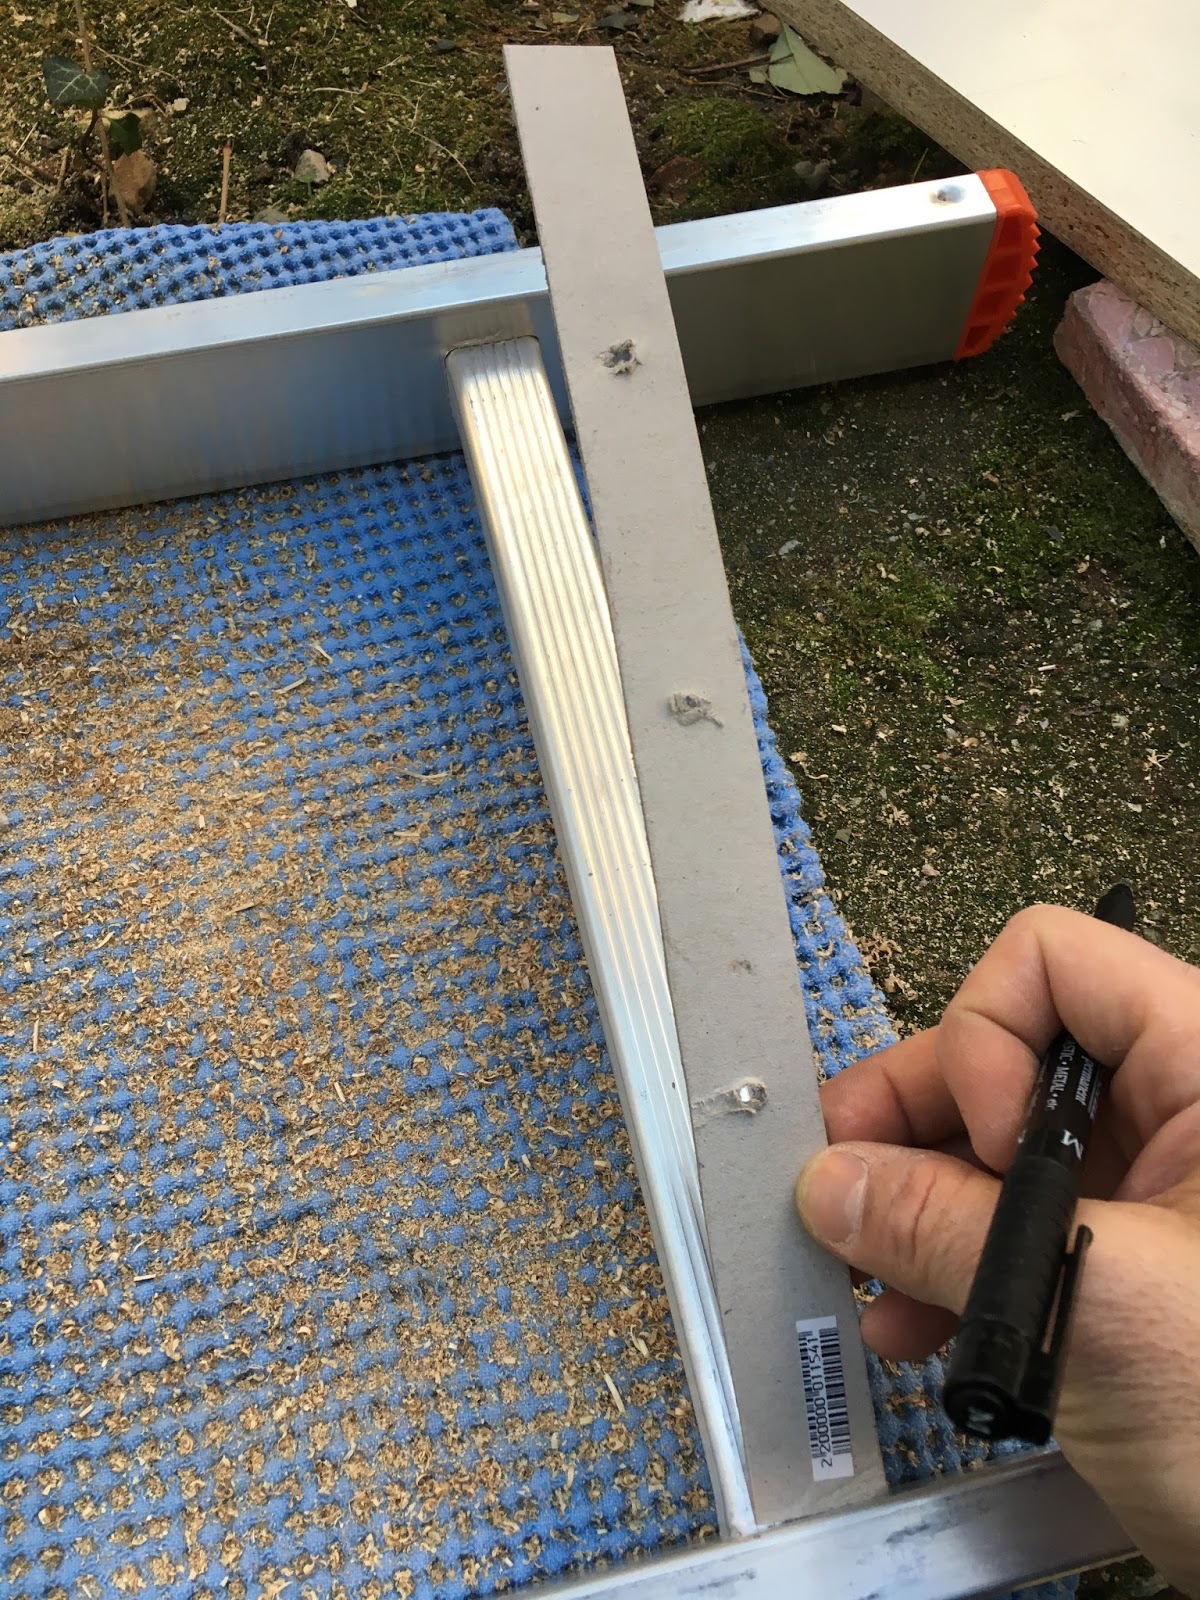
After drilling the steps I screwed the screws through, note that I did not drill the wood. 


Then I use 50 mm wheels which have 12 mm center hole:


I had spare 12 bolts with fiber nuts but I will use 12 mm rod to prevent the profile from bending sideways. I am not sure if this happens but it will be a better construction for sure. I will do it as soon as I find a 12 mm stainless rod. 

And finally I cut the other end just for the looks:


Finally I got to this:


I found out that the surface will be slippery when wet so I applied "anti slip band" on the surface of the gangway:


You may notice that I made another modification to my design. I moved the wheels inside the ladder to make it more robust against twists


Also I will add some rubber underneath where gangway touches the boat. 

Total Weight: 6,5 kg (You can drill holes between the steps to make it lighter)
Ladder: 20 €
PlyWood: 10 €
Wheels: 7 € (pair)
Stainless Bolts & Screws: 5€
Anti Slip Band: 3 €

Total Cost: 45 €

And it really looks good. 


Monday, October 31, 2016

Dodge Power Wagon W200 Strut Tower Brace

After some wheeling around I realized that chassis of my old beloved truck flexes so much. The main reason looked like the cross members under the chassis were not enough to prevent this flex.  To solve  this I searched internet about strut tower brace but no one offered a solution or idea.

At this point I was not alone, the friends at Mint Garage came with a design. I was a little selective about the design of the part since I love the looks of my engine bay. In the end I agreed to produce and install it. The tubing is stainless steel so it functions as expected and looks really good.


After the installation I made one more modification. I replaced the bolts that holds the Brace to the chassis with tapered ones. This gave me more clearance and confidence to prevent any damage to the shock absorbers during flex.


I just bolted the new construction through the holes which used to hold the original strut brackets.


More details and pictures will follow soon....


Dodge Power Wagon W200 Hydraulic Clutch System

My clutch on my W200 Power Wagon was mechanical and no hydraulic system was offered. The guy at the workshop said it is not possible to do it... Which triggered me so bad, thats why I decided to design my own. First of all, to be on the safe side I decided to get the longest stroke slave and master cylinders possible which are mainly Pull Type cylinders. Many reviewers had negative feedbacks about the pull type products so I wanted to go for push type which required the measure the total amount of travel necessary for disengage.

I found out that Slave Cylinder from Dorman is more than enough for the job. The part code is CS 360003 (33$). It is a 1" diameter, aluminum body slave cylinder for RAM trucks which approves that it is strong enough for task.


For Master Cylinder I found 7/8" diameter CNC Brakes 71178 (Steel  Body) or CNC71278 (Aluminum Body with steel sleve).


I fitted the master cylinder with a reservoir I found from Ali Express.


Aluminum Racing Drift Hydraulic Handbrake Hand Brake Oil Tank Fluid Reservoir E-brake


Unfortunately the size of the threads did not fit to the master cylinder so I had to machine an adapter for master cylinder and reservoir but the result was perfect.


Now it was time to adapt pedal fittings. 

I already ordered master cylinder fitting with the cylinder but of course, the main shaft was short for my application. I have fabricated the adapter between pedal and master cylinder.


Then a modification to the pedal was necessary to accept CNC Brake fitting (Blue part):
I welded the bracket to the pedal and drilled several holes for adjustment. 


Then it was time to drill the firewall, I found the location using extension pin and drilled with a punch. 


Now it is slave cylinder brackets turn. Below is the design of the bracket. 


Bracket is bolted to the bellhousing. Now comes another problem, even though I placed the slave as close as possible to the bellhousing the fork and slave are not inline. So I had to produce an fork extension like this:


Also I designed my push rod mechanism using link ball bearing to prevent any extra friction. 


I also had to get a specifically manufactured hydraulic hose which connects between master cylinder and slave cylinder. 


After bleeding my clutched worked perfectly. No gear grinding, no hard clutch pressure, it worked like a charm. Then I realized that my firewall flexed terribly during clutch operation. The sheet metal thickness was not enough to withstand the pressure of the master slave so I strengthened the firewall with two brackets, from inside and outside to prevent flexing. 


This modification ensured that everything will be strong enough for heavy duty functioning.


Ducati Steering Damper

I also love my 2006 Ducati Multistrada 1000DS. I ride it often but in 2016 it is not easy to find every part you need, especially if it is a performance part. It does not look like a very powerful bike compared to current crazy horsepower bikes but it is capable of over-standard acceleration and 230 kph top speeds so I wanted to buy a steering damper. Unfortunately my attempts failed every time I mailed to stores which used to stock them. So I wanted to design my own bracket for Multistrada but it is applicable to all trellis frame bikes of this era or even all frames that has same tube diameter.

I checked the original design:

It requires a lot of installation work, dismantling the tank, etc and it is not available;


First of all I checked internet for alternatives, the best possible option looked liked this:


Actually it also has a clamp to the frame but the second point is bolted to the lower triple clamp. The name is "Kuan Bracket"and it is also not produced anymore. I also did not like the idea to clamp a bracket to triple clamp but I have to give credit to the huge efforts and nice craftsmanship.


So I decided to design  my own. The tube diameter of my frame was 28,4 mm. I also purchased a clamp for my fork leg from AliExpress  :):):) It is called:

"50MM Diameter Motorcycle front shock absorber fixed steering damper damping titanium foot fixer modification Universal"


It looks like this and costs 13$:


I also purchased 75 mm stroke steering damper from Aliexpress for 48$. I hesitated a lot for safety reasons. There is no failure stories or crash experiences from any user but generally the idea to use Chinese steering damper created a lot of hesitation. I decided to give it a try at least to test if 75 mm stroke is ok and if I can fit this damper to my design. The risk of failure is so expensive if I purchased a premium damper like Ohlins or Hyperpro. The dimensions of the Chinese damper is exactly same as Hyperpro, it feels like they just copied it. Of course, internals are a big question mark.


Build quality seems good, better than expected. The operation is also smooth and damping adjustment works as expected.

It was very difficult to measure and produce this clamp as one piece so I manufactured this clamp two piece in order to try and fit the extension to clear all parts of the motorcycle.

Below is the drawing of the clamp: (all dimensions in millimeter)


I installed the clamp on the frame. Then on motorcycle, extension bolted to the damper, I marked the position of the extension. Then dis assembled all parts for welding. This is why I choose iron as material, to be able to work on it easily. Unfortunately  my welding skills are not ideal so the welds look terrible but penetration is ok.

After everything was ok I painted the parts.


This is how it looks after installation. 75 mm stroke is perfectly enough for the bike. The rod of the damper does not touch anywhere so no further modification is necessary.


I just ditched the mudflap (part no 11 in below drawing) which is bolted to the lower clamp.


As a result I have successfully installed the damper. It is perfectly effective and everything looks clean. In the future I would like to machine this clamp from one piece aluminum, it will look much better. Also a premium class damper is planned but so far the Chinese damper works better than expected.